> ## Documentation Index
> Fetch the complete documentation index at: https://docs.getcollate.io/llms.txt
> Use this file to discover all available pages before exploring further.
# Getting Started with Data Quality as Code
> Install the Collate Python SDK and configure authentication
# Getting Started with Data Quality as Code
This guide will help you install the Collate Python SDK and configure authentication to start running data quality tests programmatically.
## Prerequisites
Before you begin, ensure you have:
* Python 3.10 or higher installed
* pip package manager
* Access to an Collate instance (version 1.11.0 or later)
* A JWT token for authentication (see [Authentication](#authentication) below)
## Installation
Install the `openmetadata-ingestion` package with the necessary extras for your use case:
### Basic Installation
```bash theme={null}
pip install "openmetadata-ingestion>=1.11.0.0"
```
### Installation with Database Connectors
Install additional dependencies based on the databases you'll be testing:
```bash theme={null}
# For PostgreSQL
pip install "openmetadata-ingestion[postgres]>=1.11.0.0"
# For MySQL
pip install "openmetadata-ingestion[mysql]>=1.11.0.0"
# For BigQuery
pip install "openmetadata-ingestion[bigquery]>=1.11.0.0"
# For multiple databases
pip install "openmetadata-ingestion[postgres,mysql,bigquery]>=1.11.0.0"
```
### Installation with DataFrame Support
If you plan to use DataFrame validation features:
```bash theme={null}
pip install "openmetadata-ingestion[pandas]>=1.11.0.0"
```
### Installation with Multiple Features
Combine multiple extras as needed:
```bash theme={null}
# For DataFrame validation with Postgres support
pip install "openmetadata-ingestion[pandas,postgres]>=1.11.0.0"
# For comprehensive ETL support
pip install "openmetadata-ingestion[pandas,postgres,pyarrow]>=1.11.0.0"
```
## Authentication
Data Quality as Code requires authentication with your Collate instance. The SDK supports JWT token authentication.
### Getting a JWT Token
Obtain a JWT token in one of two ways:
**Note**: The **Bots** tile under **Settings** is only visible to users with Admin privileges. If you don't see it, ask your organization's Collate Admin to generate a bot token for you or grant you Admin access.
#### Option 1: Using an Existing Bot Token
Collate provides pre-configured bots like the `ingestion-bot`:
1. Log in to Collate platform.
2. Click the **Profile** icon and navigate to **Settings** > **Bots**.
3. Find and click the ingestion-bot.
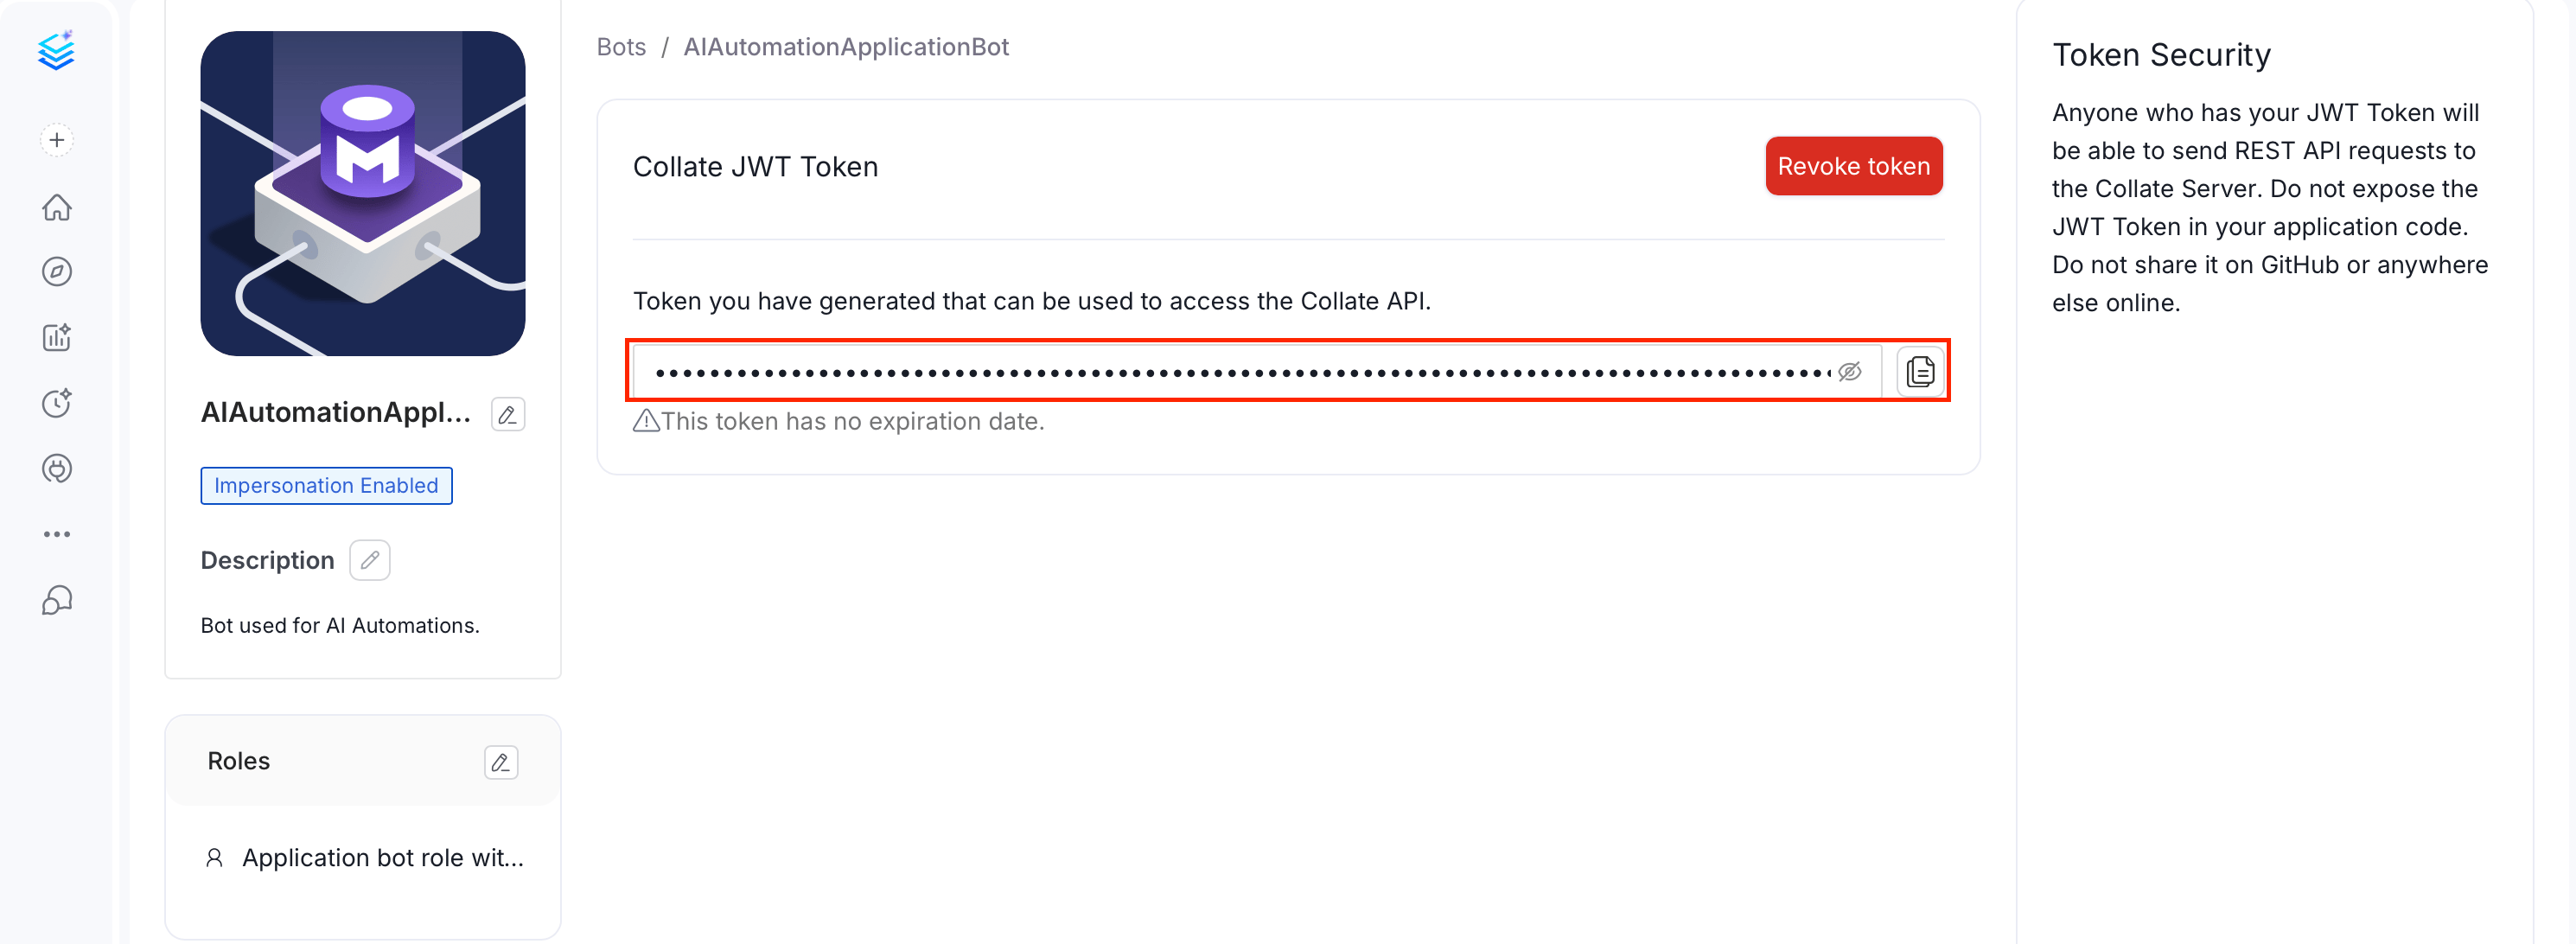
4. Copy and save the JWT token for later use.
#### Option 2: Creating a Custom Bot
For production use, create a dedicated bot with specific permissions:
1. Log in to Collate platform.
2. Click the **Profile** icon and navigate to **Settings** > **Bots**.
3. Click **Add Bot** and fill in the following fields:
* **Email** (required): Enter the bot's email address.
* **Display Name**: Enter a display name for the bot.
* **Token Expiration** (required): Select how long the JWT token should remain valid.
* **Allow Impersonation**: Leave this off unless the bot needs to act on behalf of users. This setting can only be changed at creation time.
* **Description**: Optionally add a description for the bot.
4. Click Create and slect the bot you created from the list.
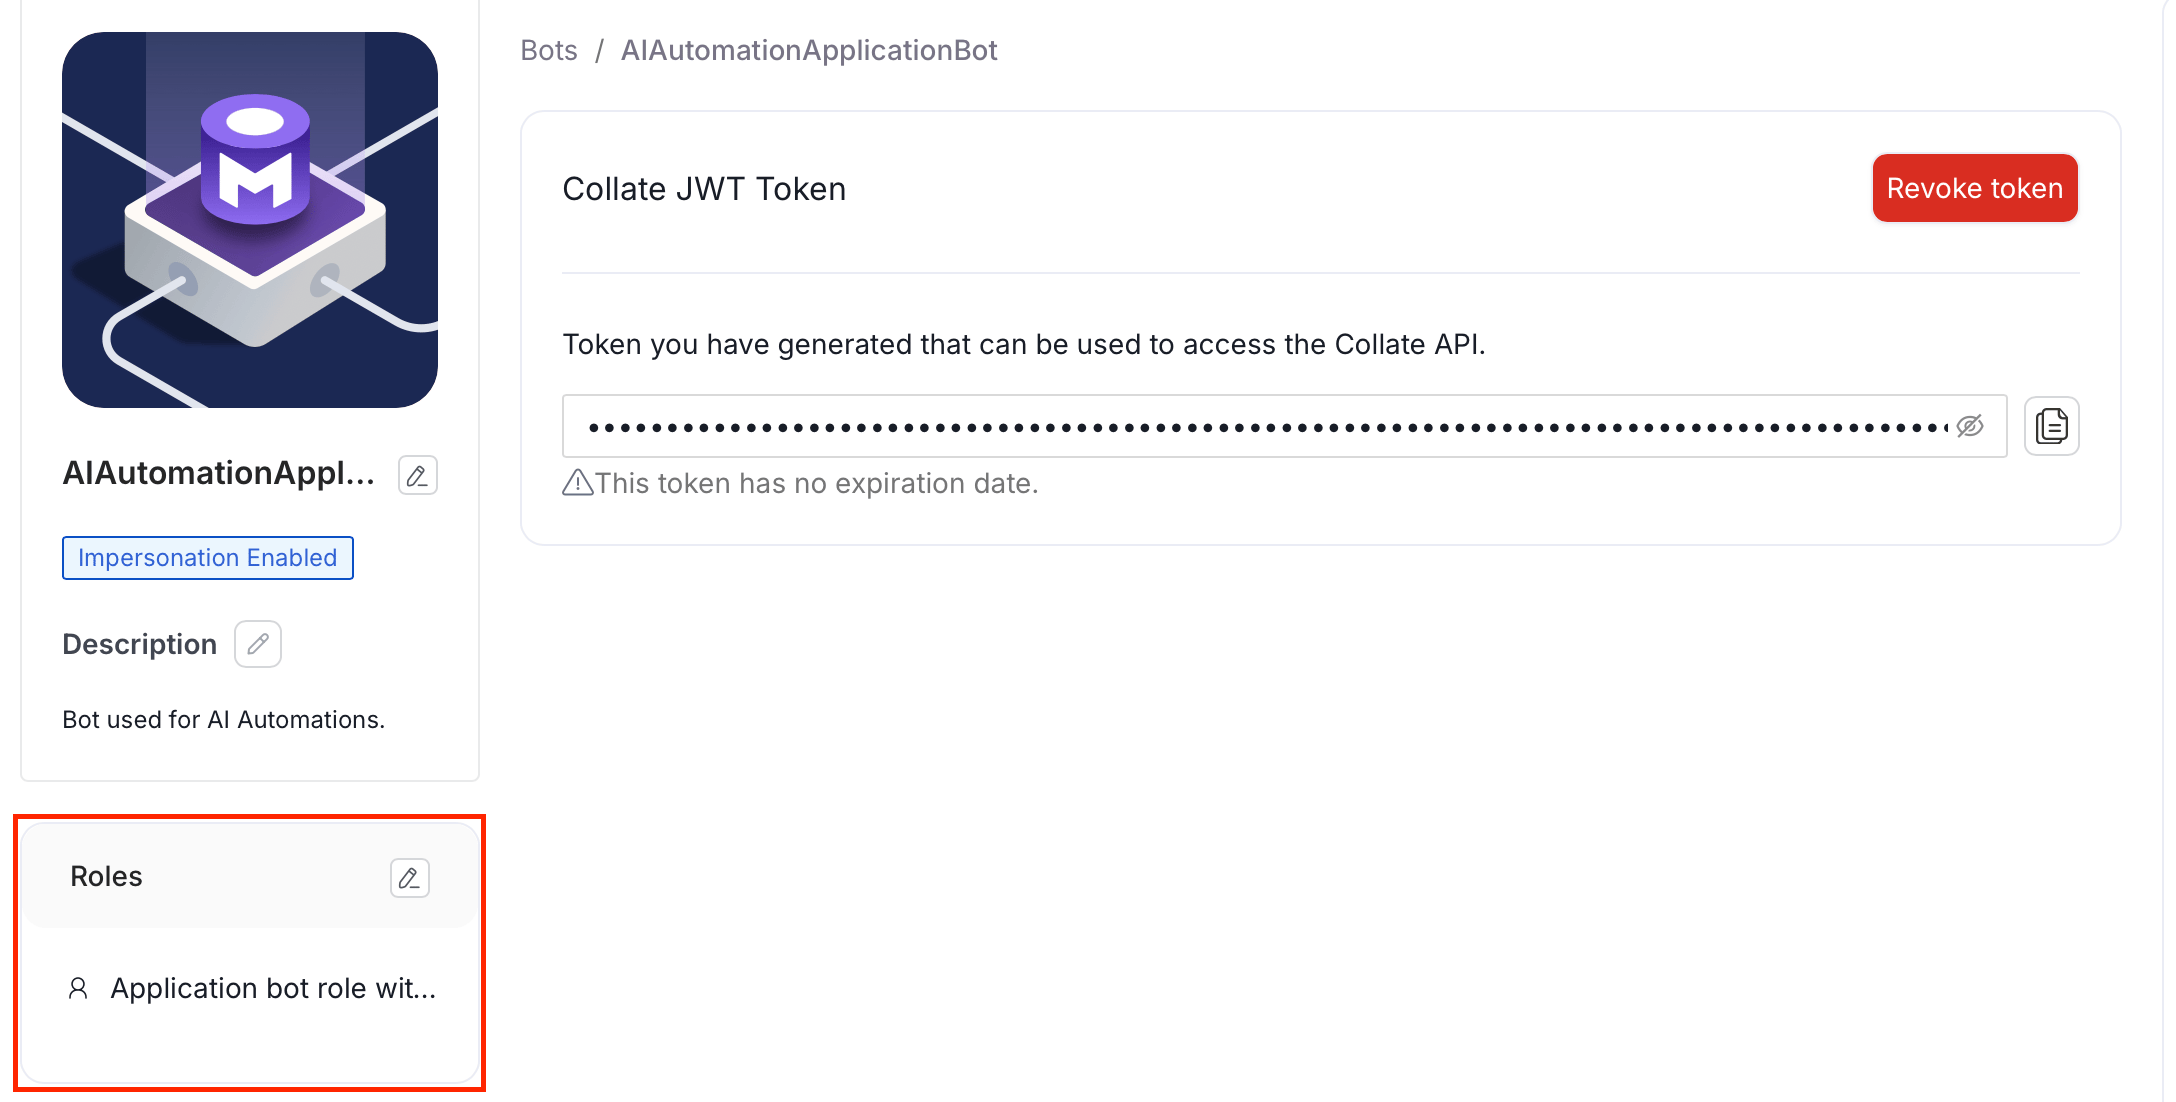
5. Assign appropriate roles (typically `DefaultBotPolicy` and `Ingestion Bot Policy`).
6. Copy and save the generated JWT token.
### Configuring the SDK
Once you have a JWT token, configure the SDK in your Python code.
If your organization uses an **external secrets manager** for credential storage, initialize it before this first `configure()` call, not after. `SecretsManagerFactory` is a singleton: whichever call runs first wins, so initializing it later in [Using External Secrets Managers](#using-external-secrets-managers) has no effect once `configure()` has already run here. See that section before continuing if this applies to you.
```python theme={null}
from metadata.sdk import configure
configure(
host="http://localhost:8585/api", # Your Collate API URL
jwt_token="your-jwt-token-here"
)
```
#### Using Environment Variables
For better security, let `configure` pick them up from environment variables:
```python theme={null}
from metadata.sdk import configure
configure()
```
Set the environment variable before running your script:
```bash theme={null}
export OPENMETADATA_HOST="http://localhost:8585/api"
export OPENMETADATA_JWT_TOKEN="your-jwt-token-here"
python your_script.py
```
#### Configuration Parameters
The `configure()` function accepts the following parameters:
| Parameter | Type | Required | Description | Environment Variable |
| ----------- | ----- | -------- | ---------------------------------------------------------- | ------------------------ |
| `host` | `str` | No | Collate API URL (for example, `http://localhost:8585/api`) | `OPENMETADATA_HOST` |
| `jwt_token` | `str` | No | JWT authentication token | `OPENMETADATA_JWT_TOKEN` |
## Using External Secrets Managers
The [Test Runner](/ai-2-0/how-to-guides/data-quality-observability/quality/data-quality-as-code/test-runner#secrets-managers) guide also links here for reference while you're testing.
**Important**: If your Collate instance uses **database-stored credentials** (the default configuration), you don't need to follow this guide. The SDK will automatically retrieve and decrypt credentials.
This guide is only necessary when your organization uses an **external secrets manager** for credential storage.
### Why This is Required
The `TestRunner` API executes data quality tests directly from your Python code (for example, within your ETL pipelines). To connect to your data sources, it needs to:
1. Retrieve the service connection configuration from Collate.
2. Decrypt the credentials stored in your secrets manager.
3. Establish a connection to the data source.
4. Execute the test cases.
Without proper secrets manager configuration, the SDK cannot decrypt credentials and will fail to connect to your data sources.
### Matching Your Collate Backend's Secrets Manager
Configure TestRunner to match whatever secrets manager provider your Collate backend already uses. The SDK cannot discover this automatically.
* **Self-hosted Collate**: your administrator already configured the secrets manager for your deployment. Use the same provider and loader values described in [Configuration by Provider](#configuration-by-provider).
* **Collate SaaS**: the secrets manager is part of the managed platform, so you don't configure or control it yourself. Contact your Collate administrator for the secrets manager provider, for example `SecretsManagerProvider.managed_aws`. Also ask for the tenant's region or vault name and access credentials scoped for your use. These details are tenant-specific, and you can't find them in code or guess them.
### General Setup Steps
1. Contact your Collate administrator to obtain:
* The secrets manager type (AWS, Azure, GCP, and so on).
* The secrets manager loader configuration.
* Required environment variables or configuration files.
* Any additional setup (IAM roles, service principals, and so on).
2. Install required dependencies for your secrets manager provider.
3. Configure environment variables with access credentials.
4. Initialize the SecretsManagerFactory before using TestRunner.
5. Authenticate with an ingestion-bot JWT instead of a personal user token. See [Authentication](#authentication) for how to obtain one.
6. Configure the SDK and run your tests.
### Example Using AWS Secrets Manager
**Required Dependencies**:
```bash theme={null}
pip install "openmetadata-ingestion[aws]>=1.11.0.0"
```
**Example Configuration**:
```python theme={null}
import os
from metadata.generated.schema.security.secrets.secretsManagerClientLoader import SecretsManagerClientLoader
from metadata.generated.schema.security.secrets.secretsManagerProvider import SecretsManagerProvider
from metadata.sdk import configure
from metadata.sdk.data_quality import TestRunner
from metadata.utils.secrets.secrets_manager_factory import SecretsManagerFactory
# Set AWS credentials and region
os.environ["AWS_ACCESS_KEY_ID"] = "your-access-key-id"
os.environ["AWS_SECRET_ACCESS_KEY"] = "your-secret-access-key"
os.environ["AWS_DEFAULT_REGION"] = "us-east-1" # Your AWS region
# Initialize secrets manager (must be done before configure())
SecretsManagerFactory(
secrets_manager_provider=SecretsManagerProvider.managed_aws,
secrets_manager_loader=SecretsManagerClientLoader.env,
)
# Configure Collate SDK
configure(
host="https://your-openmetadata-instance.com/api",
jwt_token="your-jwt-token",
)
# Use TestRunner as normal
runner = TestRunner.for_table("MySQL.production.database.my_table")
results = runner.run()
```
### Configuration by Provider
Find the configuration details for your secrets manager provider below.
#### AWS and AWS Parameter Store
**Collate's ingestion extras**: `aws` (for example, `pip install 'openmetadata-ingestion[aws]'`)
**SecretsManagerProvider: (one of)**
* `SecretsManagerProvider.aws`
* `SecretsManagerProvider.managed_aws`
* `SecretsManagerProvider.aws_ssm`
* `SecretsManagerProvider.managed_aws_ssm`
**Environment variables**:
* `AWS_ACCESS_KEY_ID`
* `AWS_SECRET_ACCESS_KEY`
* `AWS_DEFAULT_REGION`
#### Azure Key Vault
**Collate's ingestion extras**: `azure` (for example, `pip install 'openmetadata-ingestion[azure]'`)
**SecretsManagerProvider: (one of)**
* `SecretsManagerProvider.azure_kv`
* `SecretsManagerProvider.managed_azure_kv`
**Environment variables**:
* `AZURE_CLIENT_ID`
* `AZURE_CLIENT_SECRET`
* `AZURE_TENANT_ID`
* `AZURE_KEY_VAULT_NAME`
#### Google Cloud Secret Manager
**Collate's ingestion extras**: `gcp` (for example, `pip install 'openmetadata-ingestion[gcp]'`)
**SecretsManagerProvider**: `SecretsManagerProvider.gcp`
**Environment variables**:
* `GOOGLE_APPLICATION_CREDENTIALS`: Path to the credentials JSON file.
* `GOOGLE_CLOUD_PROJECT`
### Troubleshooting
* **Issue**: "Cannot decrypt service connection"
**Cause**: Secrets manager not initialized or misconfigured.
**Solution**: Ensure `SecretsManagerFactory` is initialized **before** calling `configure()` or creating the `TestRunner`.
* **Issue**: "SecretsManagerFactory settings don't take effect"
**Cause**: `SecretsManagerFactory` is a singleton. Only the first call in a Python process takes effect. If `configure()`, `TestRunner`, or anything else from `metadata.sdk` runs first, even through an earlier import, the factory already initializes with defaults. Later `SecretsManagerFactory(...)` calls are silently ignored.
**Solution**: Call `SecretsManagerFactory(...)` as the first SDK-related statement in your script. Restart the session if you're in a long-running or interactive environment, such as a notebook, where the SDK might already have been used.
* **Issue**: "Access Denied" or "Unauthorized"
**Cause**: Insufficient permissions to access secrets.
**Solution**:
* Verify IAM role/service principal has correct permissions.
* Check credentials are valid and not expired.
* Ensure correct region/vault name is specified.
* **Issue**: "Module not found" for secrets manager
**Cause**: Missing dependencies for your secrets manager.
**Solution**: Install required extras:
```bash theme={null}
# For AWS
pip install "openmetadata-ingestion[aws]"
# For Azure
pip install "openmetadata-ingestion[azure]"
# For GCP
pip install "openmetadata-ingestion[gcp]"
```
* **Issue**: Tests Fail with Connection Errors
**Cause**: Credentials not properly decrypted or secrets manager misconfigured.
**Solution**:
1. Verify secrets manager provider matches your Collate backend configuration.
2. Test credential access independently (for example, using AWS CLI, Azure CLI, and gcloud).
3. Check network connectivity to secrets manager service.
4. Enable debug logging to see detailed error messages:
```python theme={null}
import logging
logging.basicConfig(level=logging.DEBUG)
```
### Contact Your Administrator
If you're unsure about:
* Which secrets manager your organization uses.
* Required environment variables or configuration.
* Access credentials or IAM roles.
* Permissions needed.
**Contact your Collate administrator** for the specific configuration required in your environment.
### For More Information
These related pages provide more detail on secrets manager configuration:
* Learn how self-hosted deployments configure a secrets manager in [Enable Secrets Manager](/deployment/secrets-manager).
* Find provider-specific setup steps in [Supported Implementations](/deployment/secrets-manager/supported-implementations).
* See how the Hybrid Runner combines an ingestion-bot JWT with secrets manager configuration in [Hybrid Runner Secrets Management](/ai-2-0/how-to-guides/deployment/hybrid-runner/aws#secrets-management).
## Verify Installation
Create a simple test to verify your setup:
```python theme={null}
from metadata.sdk import configure
from metadata.sdk.data_quality import TestRunner
# Configure SDK
configure(
host="http://localhost:8585/api",
jwt_token="your-jwt-token-here"
)
# Test connection by creating a runner
try:
runner = TestRunner.for_table("your_service.database.schema.table")
print("✓ SDK configured successfully!")
except Exception as e:
print(f"✗ Configuration failed: {e}")
```
Replace `"your_service.database.schema.table"` with the fully qualified name of an actual table in your Collate instance.
## Your First Data Quality Test
Now that you're set up, let's run your first data quality test:
```python theme={null}
from metadata.sdk import configure
from metadata.sdk.data_quality import TestRunner, TableRowCountToBeBetween
# Configure SDK
configure(
host="http://localhost:8585/api",
jwt_token="your-jwt-token-here"
)
# Create a test runner for a specific table
runner = TestRunner.for_table("MySQL.ecommerce.public.customers")
# Add a test to verify row count is within expected range
runner.add_test(
TableRowCountToBeBetween(min_count=1000, max_count=100000)
)
# Run the tests
results = runner.run()
# Print results
for result in results:
test_case = result.testCase
test_result = result.testCaseResult
print(f"Test: {test_case.name.root}")
print(f"Status: {test_result.testCaseStatus}")
print(f"Result: {test_result.result}")
```
## Common Installation Issues
### Connection Timeout
If you experience connection timeouts, verify:
1. Collate instance is running and accessible
2. API URL is correct (should end with `/api`)
3. Network connectivity between your script and Collate
4. Firewall rules allow the connection
### Import Errors
If you encounter import errors:
```python theme={null}
ModuleNotFoundError: No module named 'metadata'
```
Verify the package is installed correctly:
```bash theme={null}
pip list | grep openmetadata
```
If not listed, reinstall:
```bash theme={null}
pip install --upgrade "openmetadata-ingestion>=1.11.0.0"
```
## Next Steps
Now that you have the SDK installed and configured:
* Learn how to [run table-level tests](/ai-2-0/how-to-guides/data-quality-observability/quality/data-quality-as-code/test-runner) using the TestRunner API
* Explore [DataFrame validation](/ai-2-0/how-to-guides/data-quality-observability/quality/data-quality-as-code/dataframe-validation) for ETL pipelines
* Review the [complete test definitions reference](/ai-2-0/how-to-guides/data-quality-observability/quality/data-quality-as-code/test-definitions)
## Additional Resources
* [Collate Python SDK Documentation](https://docs.open-metadata.org/latest/sdk/python)
* [Data Quality Overview](/ai-2-0/how-to-guides/data-quality-observability/quality)
* [Authentication & Authorization](https://docs.open-metadata.org/latest/deployment/security)
* [Examples and Tutorials](https://github.com/open-metadata/OpenMetadata/tree/main/examples/python-sdk/data-quality/README.md)
 #### Option 2: Creating a Custom Bot
For production use, create a dedicated bot with specific permissions:
1. Log in to Collate platform.
2. Click the **Profile** icon and navigate to **Settings** > **Bots**.
3. Click **Add Bot** and fill in the following fields:
* **Email** (required): Enter the bot's email address.
* **Display Name**: Enter a display name for the bot.
* **Token Expiration** (required): Select how long the JWT token should remain valid.
* **Allow Impersonation**: Leave this off unless the bot needs to act on behalf of users. This setting can only be changed at creation time.
* **Description**: Optionally add a description for the bot.
4. Click Create and slect the bot you created from the list.
5. Assign appropriate roles (typically `DefaultBotPolicy` and `Ingestion Bot Policy`).
#### Option 2: Creating a Custom Bot
For production use, create a dedicated bot with specific permissions:
1. Log in to Collate platform.
2. Click the **Profile** icon and navigate to **Settings** > **Bots**.
3. Click **Add Bot** and fill in the following fields:
* **Email** (required): Enter the bot's email address.
* **Display Name**: Enter a display name for the bot.
* **Token Expiration** (required): Select how long the JWT token should remain valid.
* **Allow Impersonation**: Leave this off unless the bot needs to act on behalf of users. This setting can only be changed at creation time.
* **Description**: Optionally add a description for the bot.
4. Click Create and slect the bot you created from the list.
5. Assign appropriate roles (typically `DefaultBotPolicy` and `Ingestion Bot Policy`).
 6. Copy and save the generated JWT token.
### Configuring the SDK
Once you have a JWT token, configure the SDK in your Python code.
6. Copy and save the generated JWT token.
### Configuring the SDK
Once you have a JWT token, configure the SDK in your Python code.