{icon &&
 }
}
{name}
{stage}Feature List
{totalAvailableFeatures.map(feature =>
✓ {feature}
)}
{unavailableFeatures.map(feature =>
✕ {feature}
)}
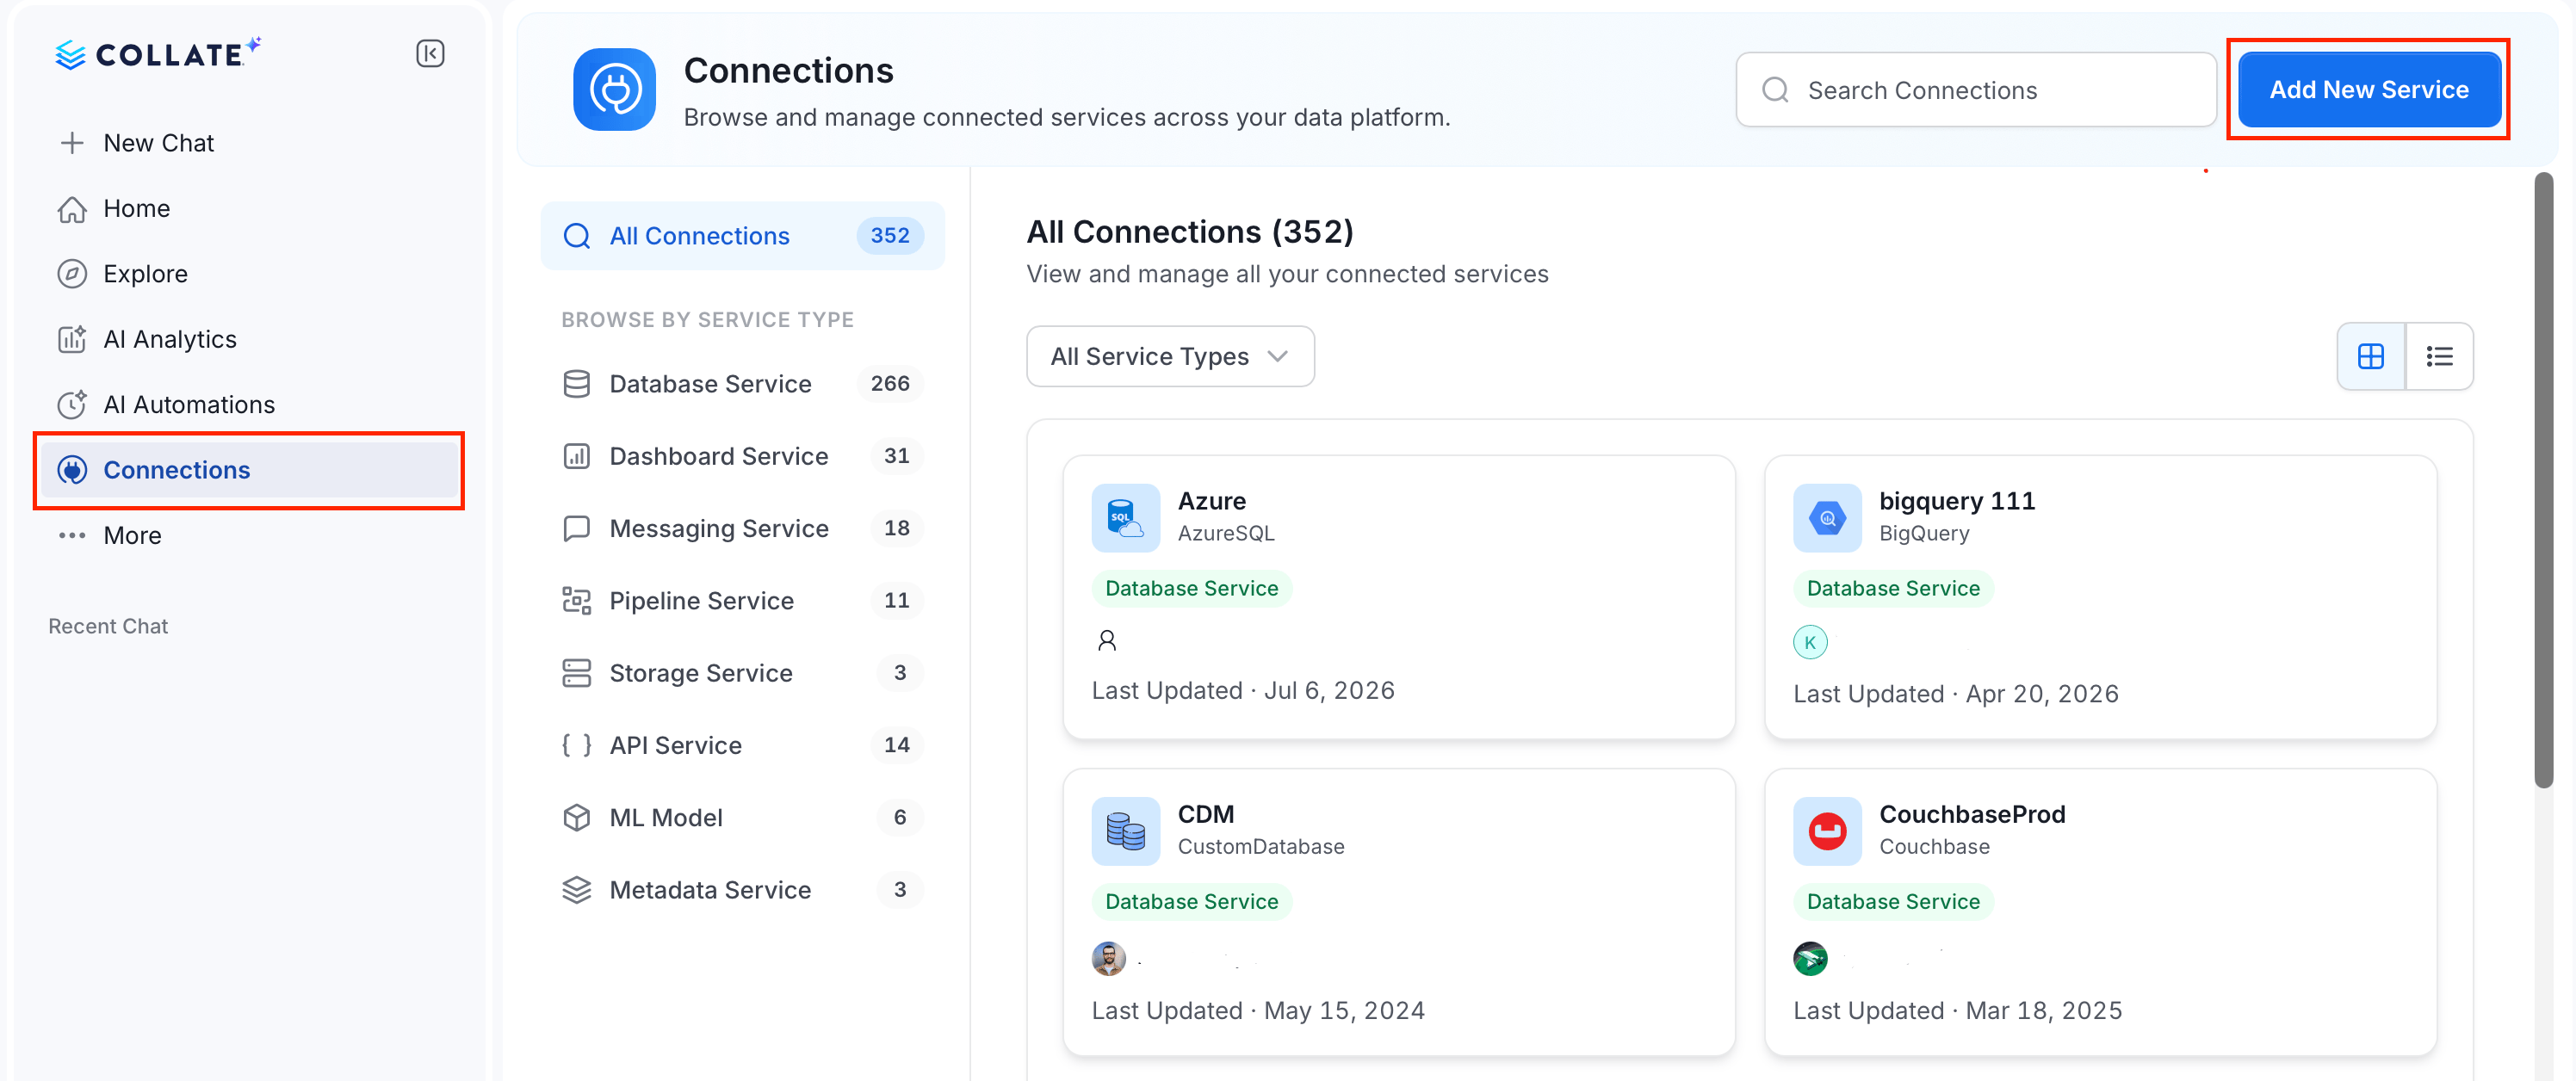 ### Step 2: Select a Service and Connector
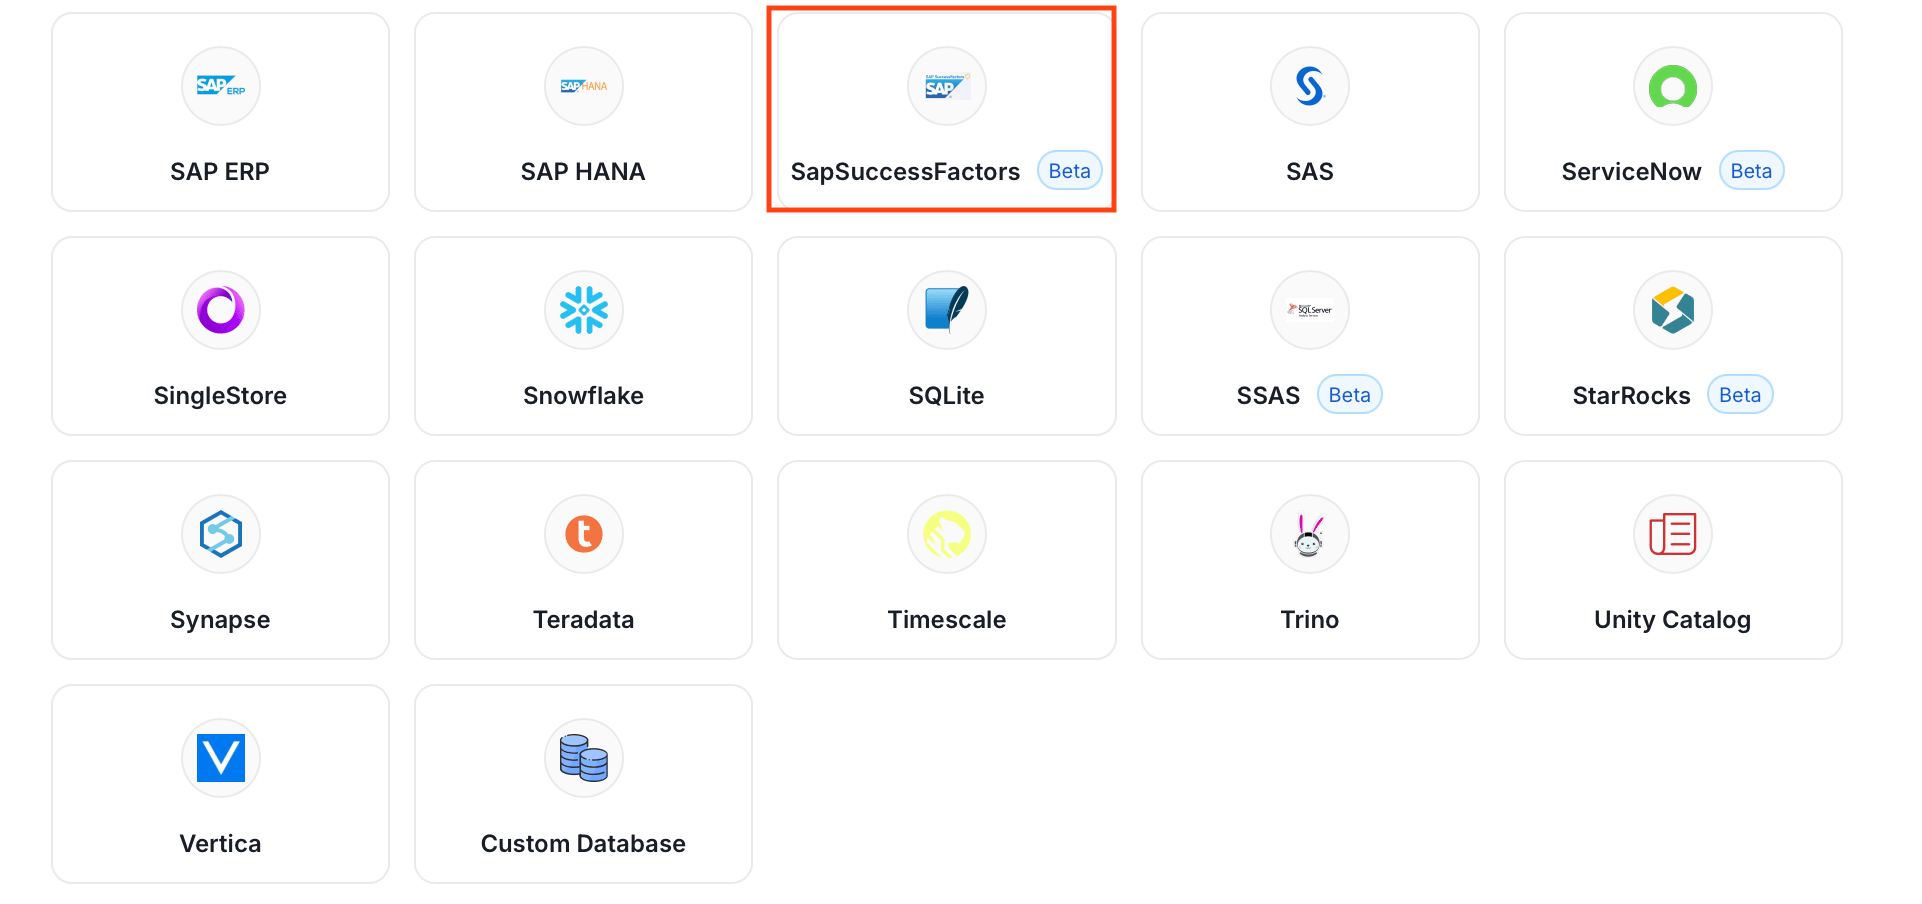
From the service type dropdown, select **Database Services**, then click the **SAP SuccessFactors** connector tile.
### Step 2: Select a Service and Connector
From the service type dropdown, select **Database Services**, then click the **SAP SuccessFactors** connector tile.
 ### Step 3: Add Service Name and Description
* Enter a unique, descriptive **Service Name**. Collate identifies services by their service name. Enter a name that distinguishes this deployment from other SAP SuccessFactors services you are ingesting metadata from.
* Optional: Enter a **Description** for the service.
### Step 3: Add Service Name and Description
* Enter a unique, descriptive **Service Name**. Collate identifies services by their service name. Enter a name that distinguishes this deployment from other SAP SuccessFactors services you are ingesting metadata from.
* Optional: Enter a **Description** for the service.

 #### Enter Connection Details
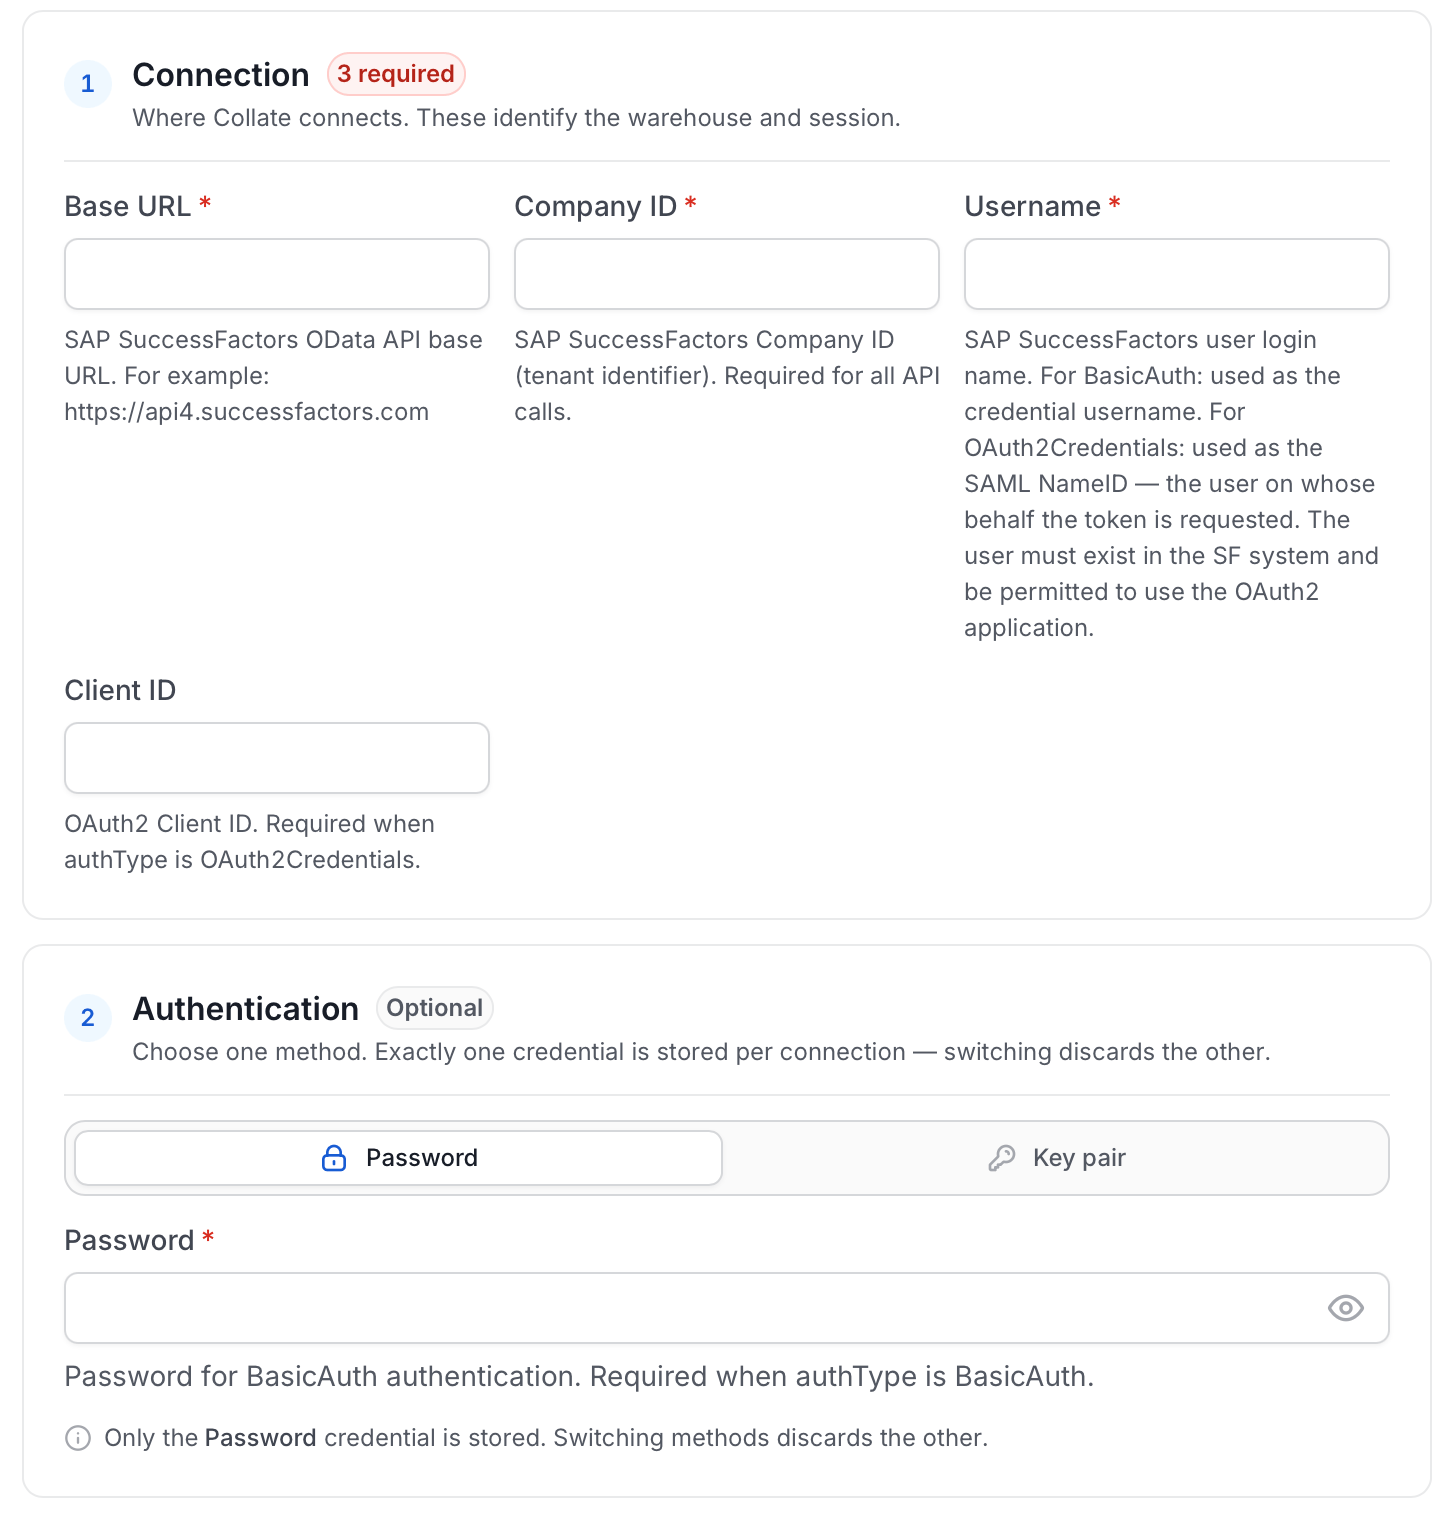
Enter the connection details for SAP SuccessFactors. The right-hand panel in the UI displays inline help for each field.
#### Enter Connection Details
Enter the connection details for SAP SuccessFactors. The right-hand panel in the UI displays inline help for each field.
 **Connection**
* **Base URL**: SAP SuccessFactors OData API base URL, for example `https://api4.successfactors.com`.
* **Company ID**: SAP SuccessFactors Company ID (tenant identifier). Required for all API calls.
* **Username**: SAP SuccessFactors user login name. For **Password** authentication, this is the credential username. For **Key pair** authentication, this is the SAML NameID: the user on whose behalf the token is requested. The user must exist in the SF system and be permitted to use the OAuth2 application.
* **Client ID**: OAuth2 Client ID. Required when using **Key pair** authentication.
**Authentication**: choose one method:
* **Password**: Password for **Password** authentication. Required when using this method.
* **Key pair**: PEM-encoded RSA private key used to sign SAML assertions for the OAuth2 SAML Bearer flow. Required when using this method.
**Connection**
* **Base URL**: SAP SuccessFactors OData API base URL, for example `https://api4.successfactors.com`.
* **Company ID**: SAP SuccessFactors Company ID (tenant identifier). Required for all API calls.
* **Username**: SAP SuccessFactors user login name. For **Password** authentication, this is the credential username. For **Key pair** authentication, this is the SAML NameID: the user on whose behalf the token is requested. The user must exist in the SF system and be permitted to use the OAuth2 application.
* **Client ID**: OAuth2 Client ID. Required when using **Key pair** authentication.
**Authentication**: choose one method:
* **Password**: Password for **Password** authentication. Required when using this method.
* **Key pair**: PEM-encoded RSA private key used to sign SAML assertions for the OAuth2 SAML Bearer flow. Required when using this method.
 ### Step 5: Configure Ingestion Options
In the **What to Ingest** step, use filter patterns to control which assets Collate ingests from your database service. Filter patterns use regular expressions applied to asset names.
#### How Filter Patterns Work
* **Include**: Add one or more comma-separated regular expressions. Collate ingests only assets whose names match at least one expression. Leave blank to include all assets.
* **Exclude**: Add one or more comma-separated regular expressions. Collate skips any asset whose name matches an expression. Leave blank to exclude nothing.
Rules match asset names using one of five expressions:
* **contains**: matches any name containing the value. For example, `sales` matches `my_sales_data` and `sales_2024`.
* **starts with**: matches names beginning with the value. For example, `prod_` matches `prod_db` and `prod_schema`.
* **ends with**: matches names ending with the value. For example, `_raw` matches `events_raw` and `logs_raw`.
* **is exactly**: matches the exact name only. For example, `analytics` matches only `analytics`.
* **matches regex**: matches names using a regular expression. For example, `^prod_.*_v\d+$` matches `prod_events_v1`.
When both Include and Exclude are set, Exclude takes priority.
### Step 5: Configure Ingestion Options
In the **What to Ingest** step, use filter patterns to control which assets Collate ingests from your database service. Filter patterns use regular expressions applied to asset names.
#### How Filter Patterns Work
* **Include**: Add one or more comma-separated regular expressions. Collate ingests only assets whose names match at least one expression. Leave blank to include all assets.
* **Exclude**: Add one or more comma-separated regular expressions. Collate skips any asset whose name matches an expression. Leave blank to exclude nothing.
Rules match asset names using one of five expressions:
* **contains**: matches any name containing the value. For example, `sales` matches `my_sales_data` and `sales_2024`.
* **starts with**: matches names beginning with the value. For example, `prod_` matches `prod_db` and `prod_schema`.
* **ends with**: matches names ending with the value. For example, `_raw` matches `events_raw` and `logs_raw`.
* **is exactly**: matches the exact name only. For example, `analytics` matches only `analytics`.
* **matches regex**: matches names using a regular expression. For example, `^prod_.*_v\d+$` matches `prod_events_v1`.
When both Include and Exclude are set, Exclude takes priority.
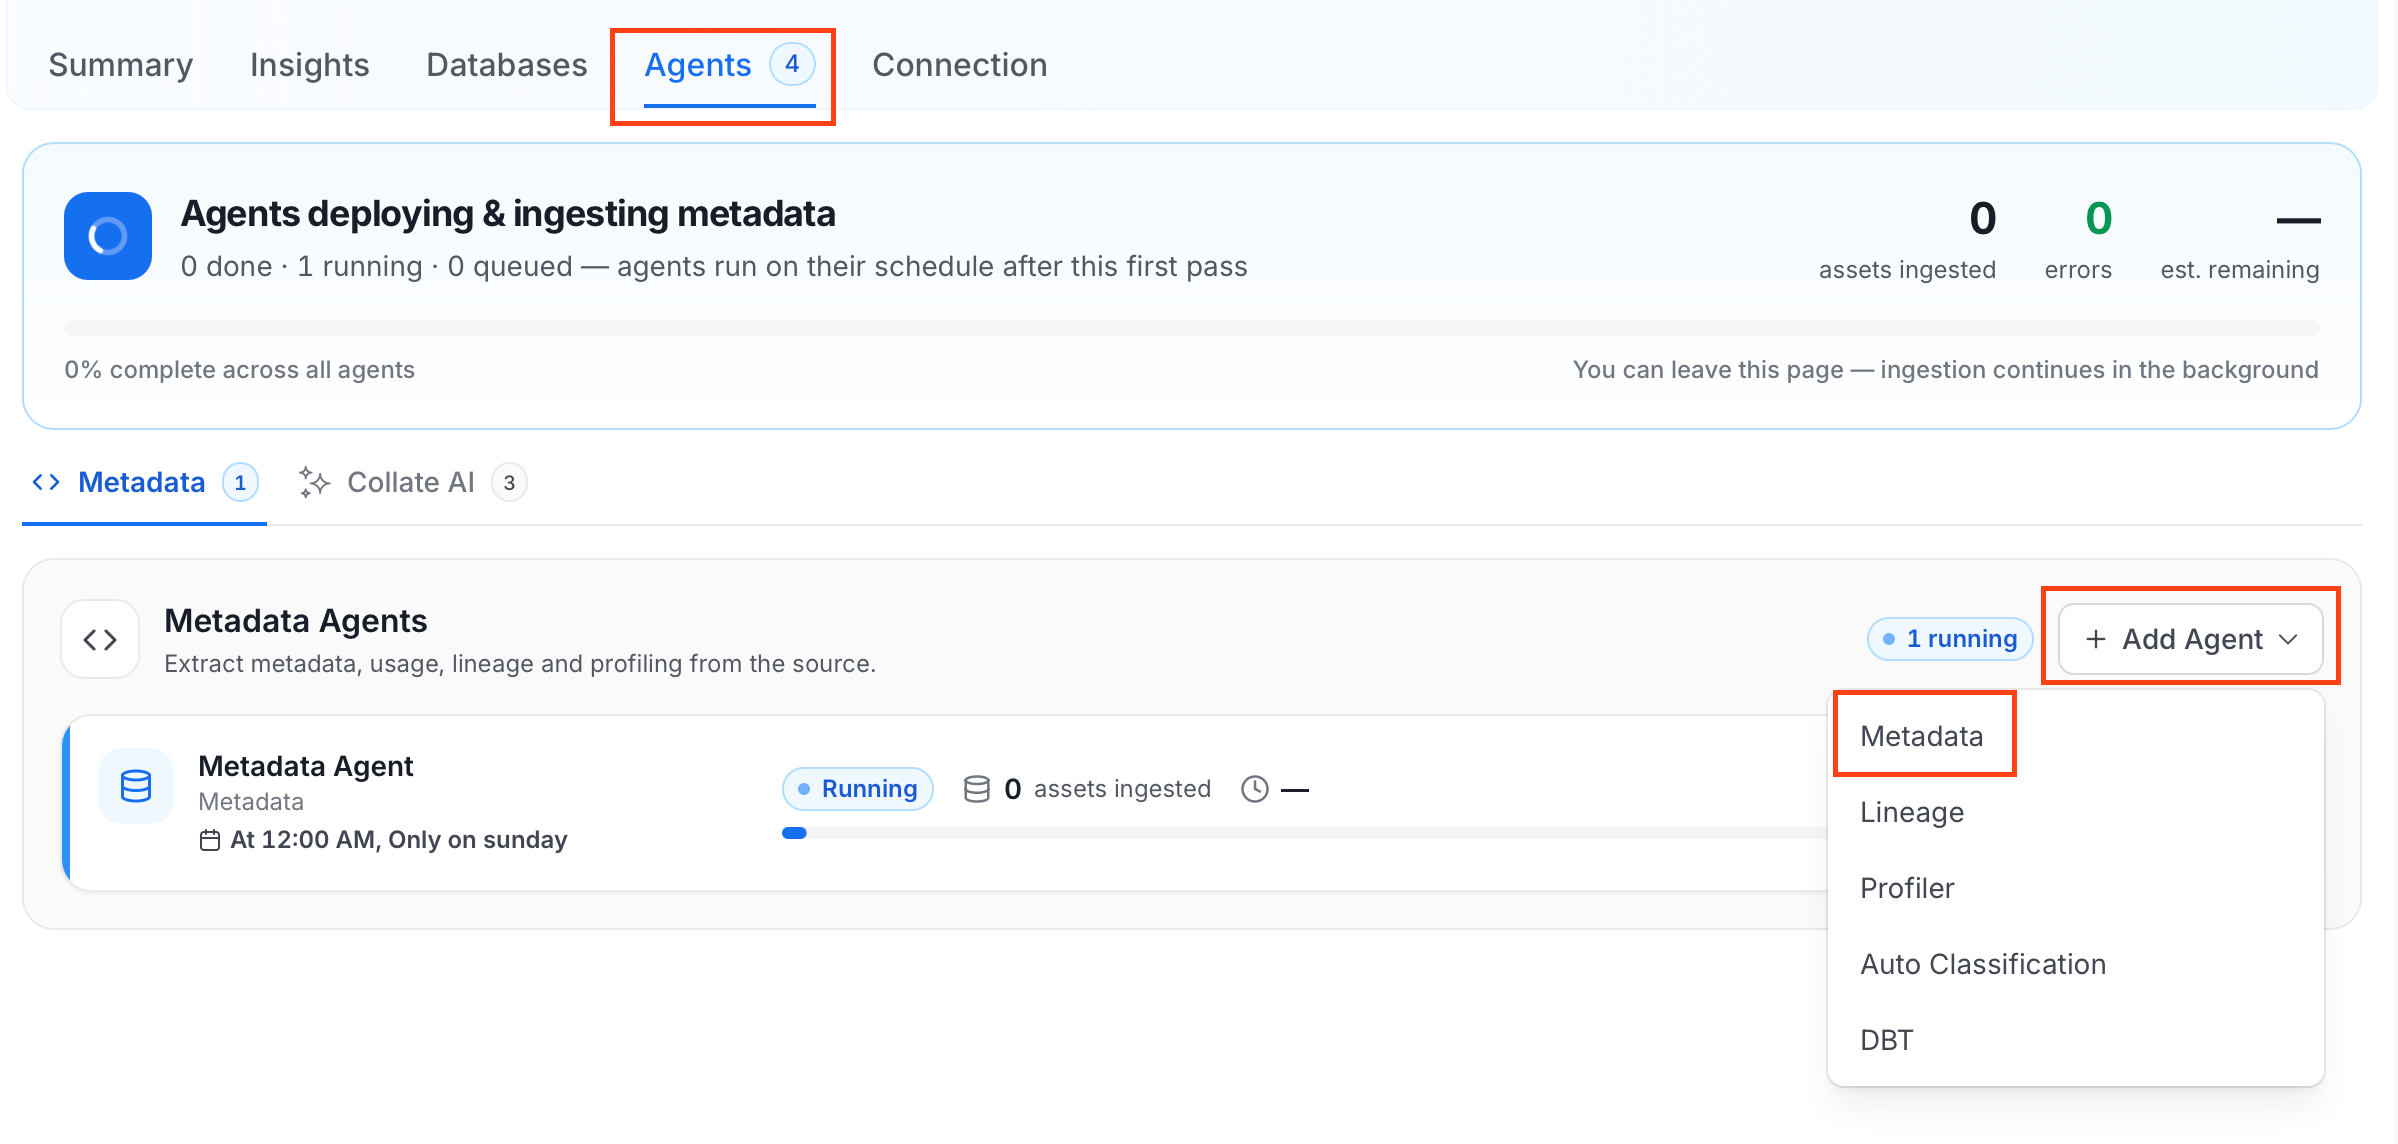 For some services, the dropdown is not available and clicking **Add Agent** takes you directly to the agent configuration page.
4. On the **Configure Ingestion** page, do the following and click **Next**.
* **Name this Ingestion**: Enter a unique recognizable name for this ingestion pipeline.
For some services, the dropdown is not available and clicking **Add Agent** takes you directly to the agent configuration page.
4. On the **Configure Ingestion** page, do the following and click **Next**.
* **Name this Ingestion**: Enter a unique recognizable name for this ingestion pipeline.
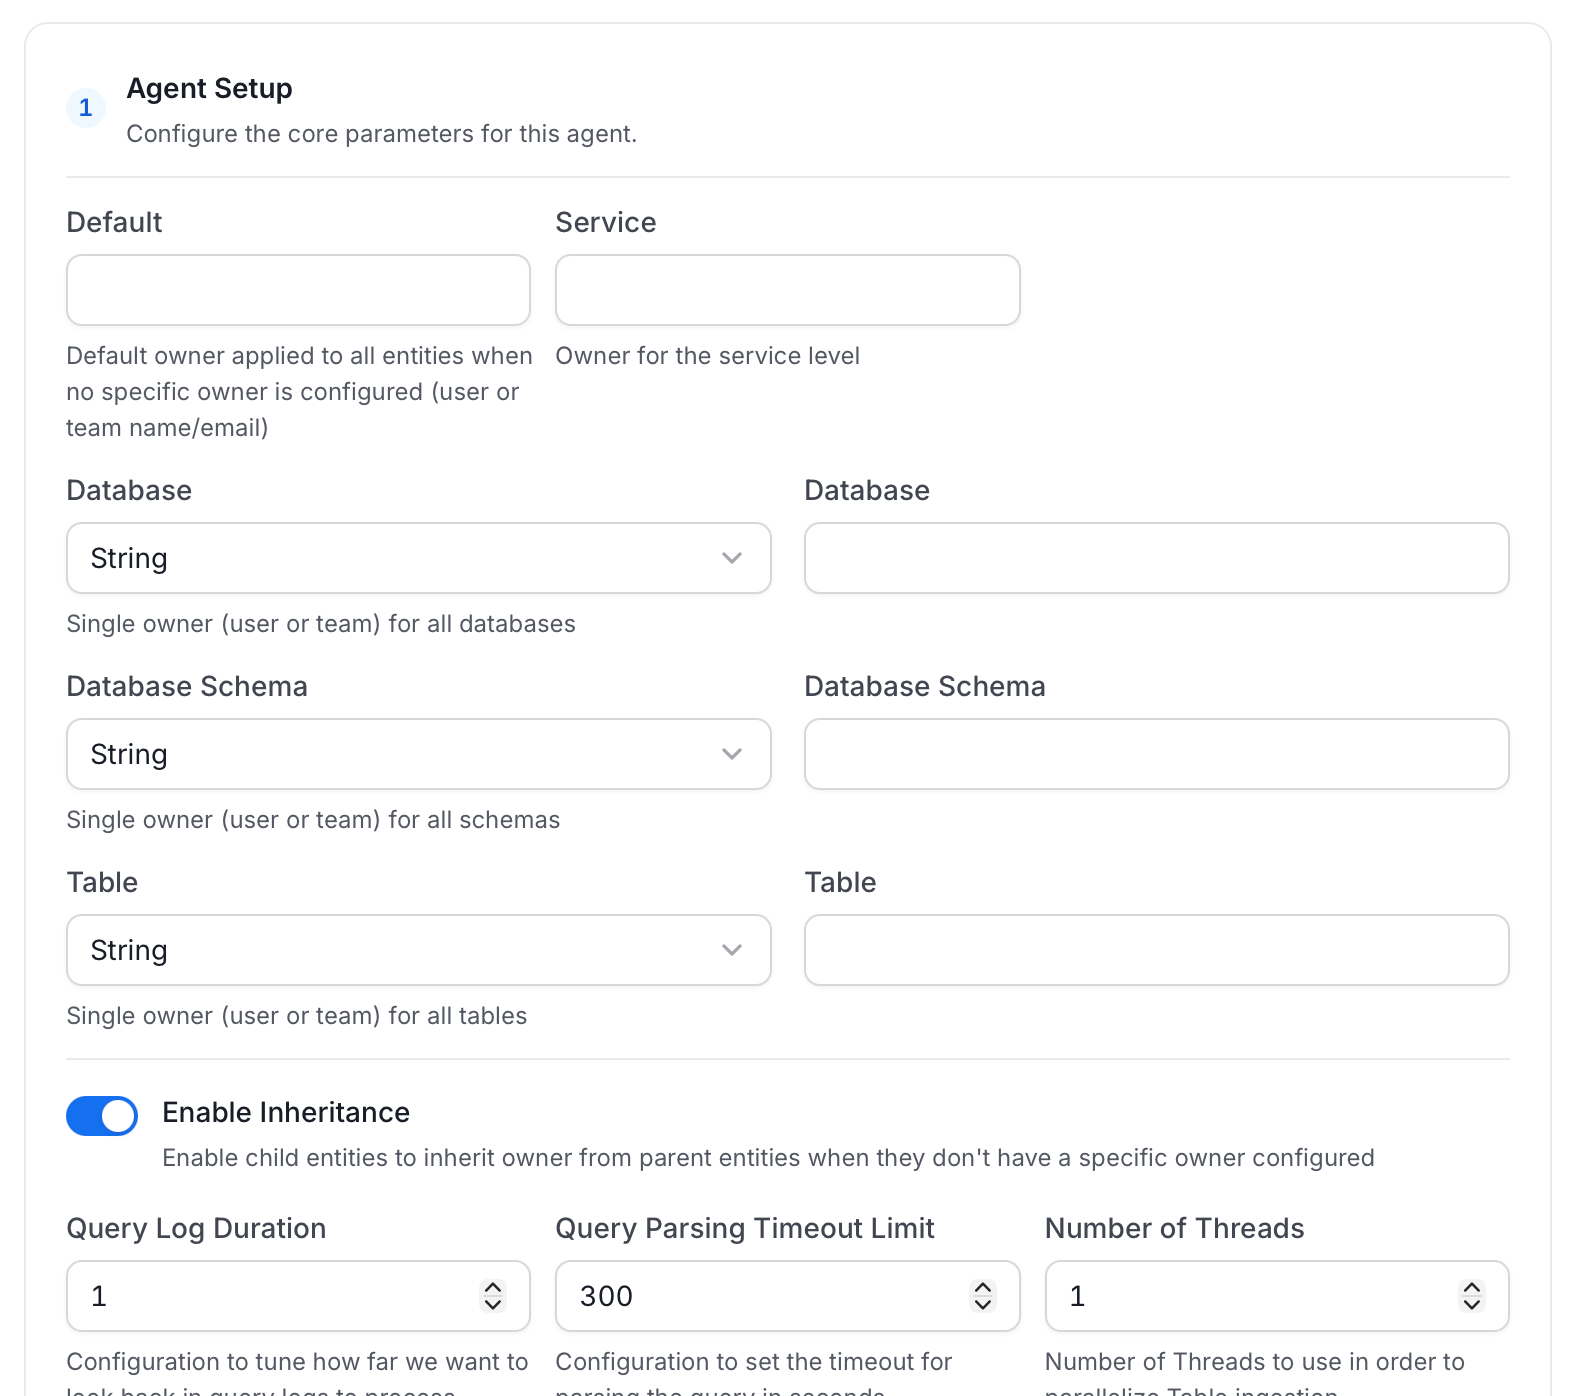
 * **Agent Setup**: Configure core parameters for metadata extraction. The following fields are available:
| Field | Default | Description |
| ----------------------------------------- | ------- | ------------------------------------------------------------------------------------------------------------------------------------------------------------------------------------------------------------------------------------------------------------------------------------------------------------------- |
| **Default Owner** | — | Owner applied to any entity that has no owner from a more specific field below. Accepts a user or a team, by name or email. |
| **Service Owner** | — | Owner assigned to the service entity itself (the connector/service you're setting up, not the data inside it). |
| **Database Owner** | — | Owner assigned to every database this agent ingests. Accepts either one owner for all of them, or a mapping of specific owners per database. |
| **Database Schema Owner** | — | Owner assigned to every schema this agent ingests. Accepts either one owner for all of them, or a mapping of specific owners per schema. |
| **Table Owner** | — | Owner assigned to every table this agent ingests. Accepts either one owner for all of them, or a mapping of specific owners per table. |
| **Enable Inheritance** | On | When on, an entity with no owner of its own inherits one from the nearest parent that has one, checked in this order: table, then schema, then database, then service, then Default Owner. Turn off if you want only the owners set explicitly above to apply, with no fallback. |
| **Query Log Duration** | 1 | How many days of query logs to look back through when processing stored procedure results. |
| **Query Parsing Timeout Limit** | 300 | How many seconds to spend parsing a single query before giving up on it and moving to the next. Raise this if large or complex queries are being skipped. |
| **Number of Threads** | 1 | How many tables to ingest in parallel. Raising this can speed up ingestion on databases with many tables, at the cost of more load on the source. |
| **Incremental Extraction** | Off | When on, a run extracts only entities that changed since the last successful run, instead of re-scanning everything every time. Faster on large, mostly-unchanged databases. |
| **Successful Pipeline Run Lookback Days** | 7 | Only used when Incremental Extraction is on. How many days back to search for a prior successful run to use as the starting point for "what changed since then." |
| **Safety Margin Days** | 1 | Only used when Incremental Extraction is on. Extra days added before that starting point, as a buffer so changes that were still in flight when the last run finished aren't missed. |
| **Extract JSON Schema** | Off | Sample values in JSON columns to infer and ingest their schema, so the individual fields inside a JSON column are visible in Collate rather than just "JSON". Requires `SELECT` permission on the sampled tables; if that permission is missing, the JSON column is still ingested, just without a detailed schema. |
| **JSON Schema Sample Size** | 10 | Only used when Extract JSON Schema is on. Number of rows sampled per JSON column to infer its schema. A larger sample gives more accurate results but takes longer to run. |
For more information about how the Default Owner, Service Owner, Database Owner, Database Schema Owner, Table Owner, and Enable Inheritance fields resolve an owner, see [Hierarchical Owner Configuration](/ai-2-0/how-to-guides/guide-for-data-users/ingestion/workflows/metadata/hierarchical-owner-configuration).
* **Agent Setup**: Configure core parameters for metadata extraction. The following fields are available:
| Field | Default | Description |
| ----------------------------------------- | ------- | ------------------------------------------------------------------------------------------------------------------------------------------------------------------------------------------------------------------------------------------------------------------------------------------------------------------- |
| **Default Owner** | — | Owner applied to any entity that has no owner from a more specific field below. Accepts a user or a team, by name or email. |
| **Service Owner** | — | Owner assigned to the service entity itself (the connector/service you're setting up, not the data inside it). |
| **Database Owner** | — | Owner assigned to every database this agent ingests. Accepts either one owner for all of them, or a mapping of specific owners per database. |
| **Database Schema Owner** | — | Owner assigned to every schema this agent ingests. Accepts either one owner for all of them, or a mapping of specific owners per schema. |
| **Table Owner** | — | Owner assigned to every table this agent ingests. Accepts either one owner for all of them, or a mapping of specific owners per table. |
| **Enable Inheritance** | On | When on, an entity with no owner of its own inherits one from the nearest parent that has one, checked in this order: table, then schema, then database, then service, then Default Owner. Turn off if you want only the owners set explicitly above to apply, with no fallback. |
| **Query Log Duration** | 1 | How many days of query logs to look back through when processing stored procedure results. |
| **Query Parsing Timeout Limit** | 300 | How many seconds to spend parsing a single query before giving up on it and moving to the next. Raise this if large or complex queries are being skipped. |
| **Number of Threads** | 1 | How many tables to ingest in parallel. Raising this can speed up ingestion on databases with many tables, at the cost of more load on the source. |
| **Incremental Extraction** | Off | When on, a run extracts only entities that changed since the last successful run, instead of re-scanning everything every time. Faster on large, mostly-unchanged databases. |
| **Successful Pipeline Run Lookback Days** | 7 | Only used when Incremental Extraction is on. How many days back to search for a prior successful run to use as the starting point for "what changed since then." |
| **Safety Margin Days** | 1 | Only used when Incremental Extraction is on. Extra days added before that starting point, as a buffer so changes that were still in flight when the last run finished aren't missed. |
| **Extract JSON Schema** | Off | Sample values in JSON columns to infer and ingest their schema, so the individual fields inside a JSON column are visible in Collate rather than just "JSON". Requires `SELECT` permission on the sampled tables; if that permission is missing, the JSON column is still ingested, just without a detailed schema. |
| **JSON Schema Sample Size** | 10 | Only used when Extract JSON Schema is on. Number of rows sampled per JSON column to infer its schema. A larger sample gives more accurate results but takes longer to run. |
For more information about how the Default Owner, Service Owner, Database Owner, Database Schema Owner, Table Owner, and Enable Inheritance fields resolve an owner, see [Hierarchical Owner Configuration](/ai-2-0/how-to-guides/guide-for-data-users/ingestion/workflows/metadata/hierarchical-owner-configuration).
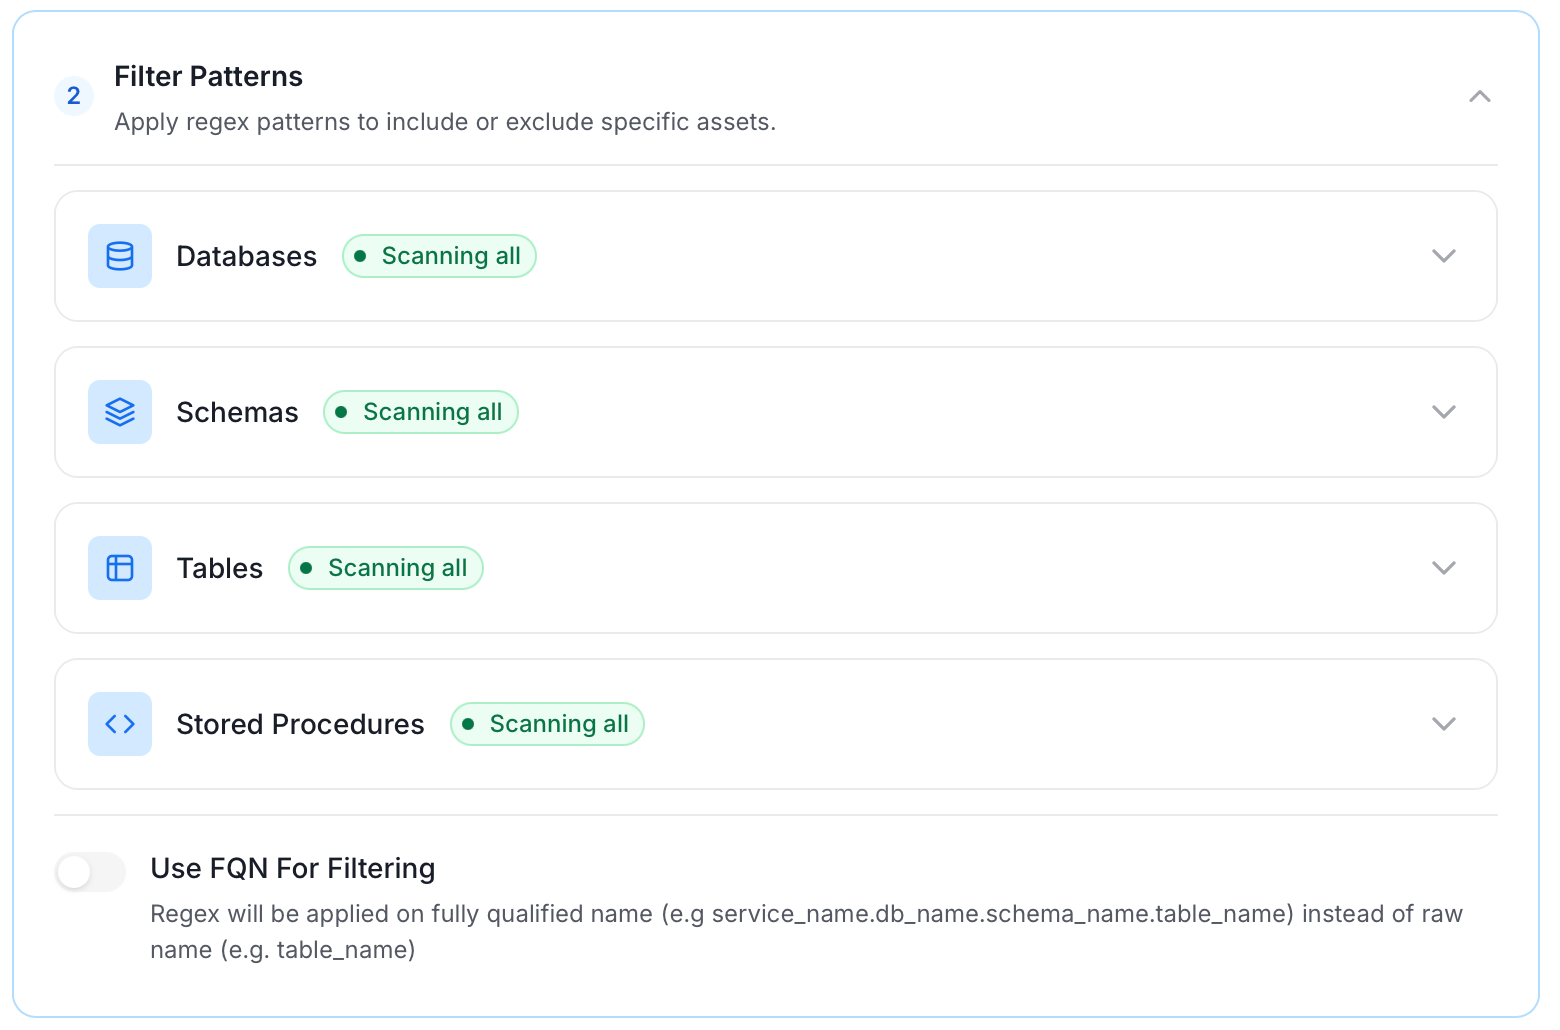
 * **Filter Patterns**: Apply include or exclude rules to scope which databases, schemas, tables, and stored procedures this agent ingests. For more information about various filter options, see **Step 5: Configure Ingestion Options**.
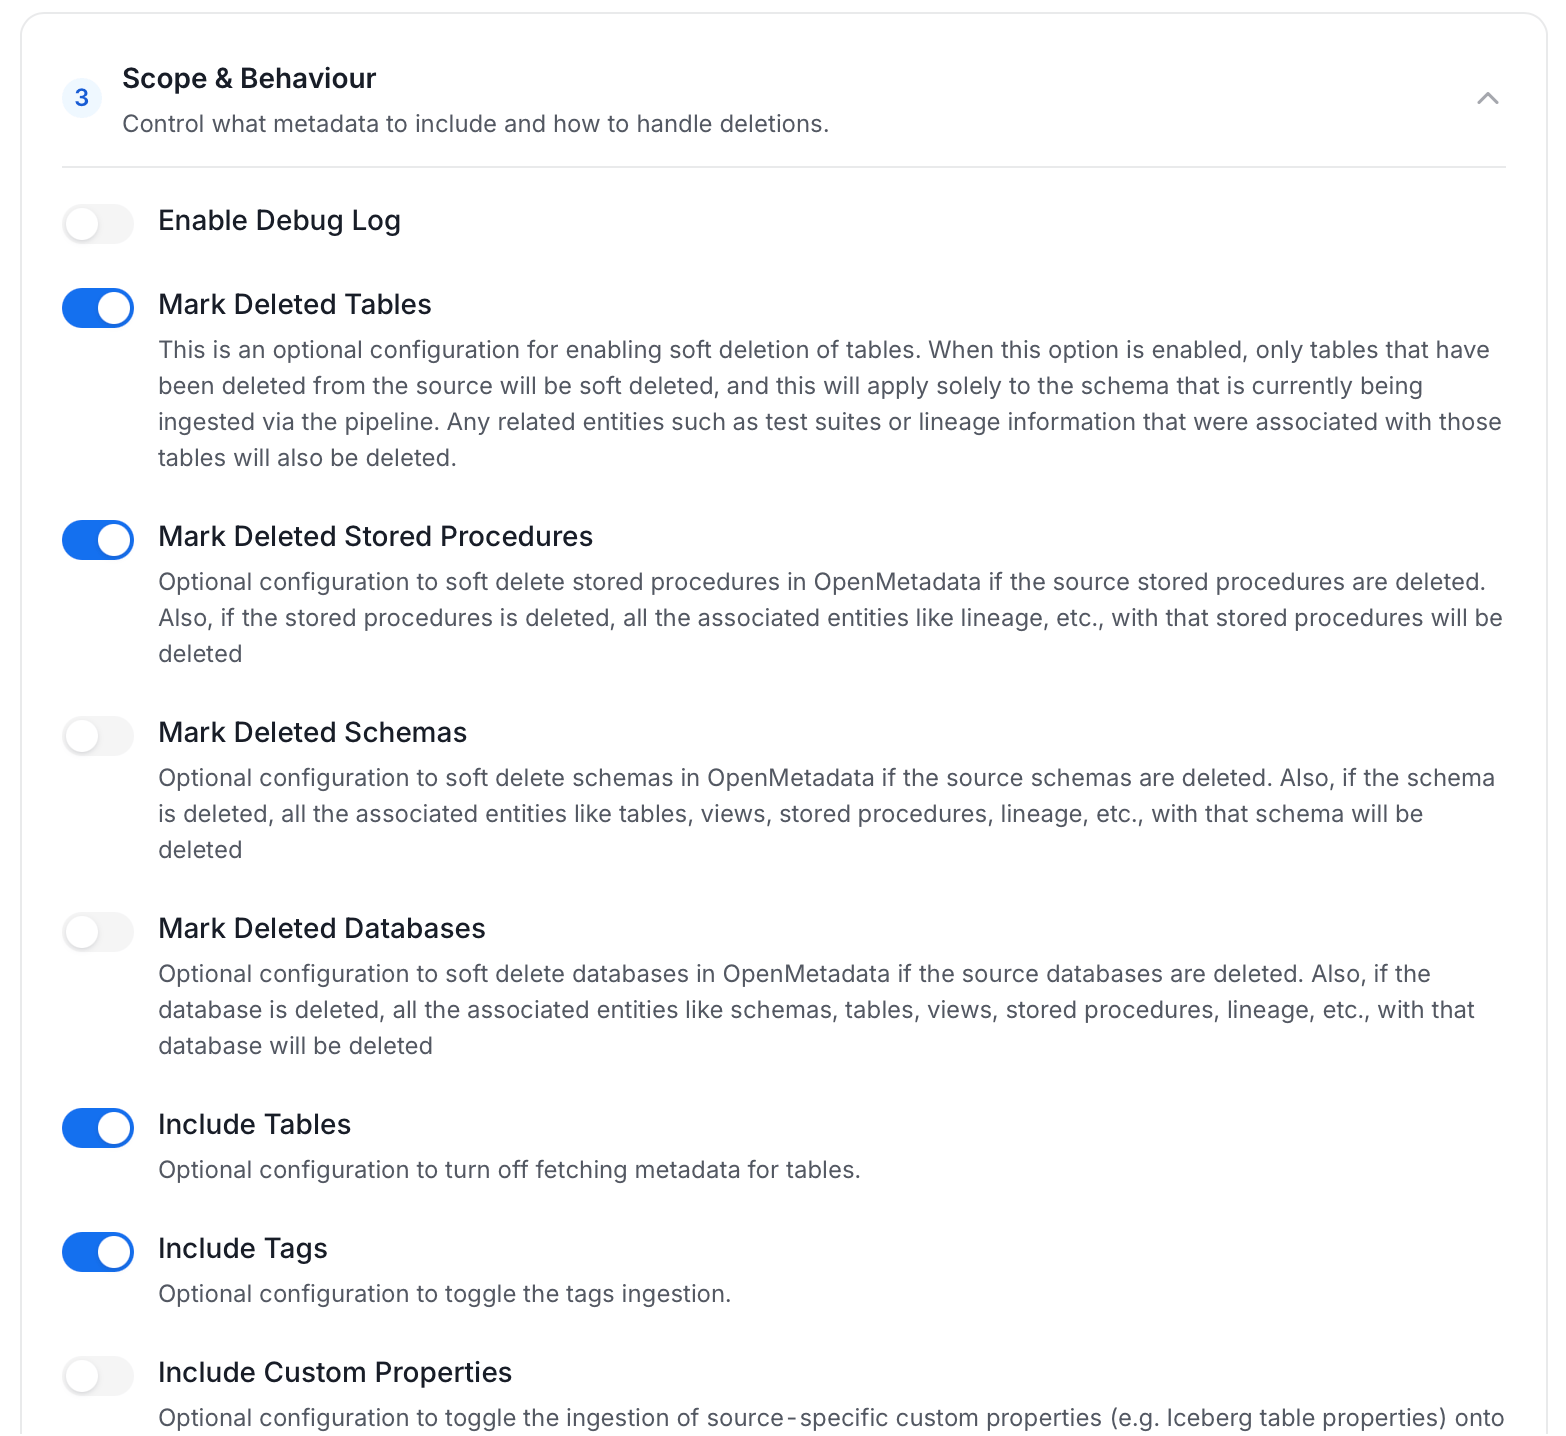
 * **Scope & Behaviour**: Control how the agent handles metadata during ingestion. Toggle each option on or off based on your needs:
| Toggle | Default | Description |
| ---------------------------------- | ------- | ------------------------------------------------------------------------------------------------------------------------------------------------------------------------------------------------------------------------------------------------------- |
| **Include Tables** | On | Ingest tables and their columns. Turn off to skip tables entirely, for example if this agent exists only to pull tags or stored procedures. |
| **Include Tags** | On | Ingest tags already defined on tables/columns in the source system (for example, a classification tag applied in Snowflake) and bring them into Collate as tags on the same assets. |
| **Include Stored Procedures** | On | Ingest stored procedures as their own assets, so they show up in the catalog and can be linked into lineage. |
| **Include DDL Statements** | Off | Also ingest the raw `CREATE TABLE` / `CREATE VIEW` statement for each asset, so it's viewable in Collate alongside the asset's metadata. |
| **Include Owners** | Off | When an ingested asset's owner in the source system is an email that matches an existing Collate user, assign that user as the asset's owner. Never overwrites an owner an asset already has in Collate. |
| **Include Custom Properties** | Off | Ingest source-specific metadata that doesn't map to a standard Collate field (for example, a database-specific attribute) into custom properties on the asset, if custom properties have been defined for that entity type. |
| **Mark Deleted Tables** | On | If a table this agent previously ingested no longer exists in the source, soft-delete it in Collate too. Only affects tables within schemas this agent actually scans. |
| **Mark Deleted Stored Procedures** | On | Same as Mark Deleted Tables, but for stored procedures. |
| **Mark Deleted Schemas** | Off | If an entire schema this agent previously ingested no longer exists in the source, soft-delete the schema and everything in it. |
| **Mark Deleted Databases** | Off | If an entire database this agent previously ingested no longer exists in the source, soft-delete the database and everything in it. |
| **Override Metadata** | Off | On: values from the source (descriptions, tags, owners, display names) always overwrite what's currently in Collate, even if someone edited it there. Off: Collate only fills in fields that are still empty, so manual edits in Collate are preserved. |
| **Enable Debug Log** | Off | Run this ingestion at DEBUG log verbosity instead of the normal level. Turn on when troubleshooting a failing or unexpected run; leave off otherwise, since debug logs are much larger. |
* **Scope & Behaviour**: Control how the agent handles metadata during ingestion. Toggle each option on or off based on your needs:
| Toggle | Default | Description |
| ---------------------------------- | ------- | ------------------------------------------------------------------------------------------------------------------------------------------------------------------------------------------------------------------------------------------------------- |
| **Include Tables** | On | Ingest tables and their columns. Turn off to skip tables entirely, for example if this agent exists only to pull tags or stored procedures. |
| **Include Tags** | On | Ingest tags already defined on tables/columns in the source system (for example, a classification tag applied in Snowflake) and bring them into Collate as tags on the same assets. |
| **Include Stored Procedures** | On | Ingest stored procedures as their own assets, so they show up in the catalog and can be linked into lineage. |
| **Include DDL Statements** | Off | Also ingest the raw `CREATE TABLE` / `CREATE VIEW` statement for each asset, so it's viewable in Collate alongside the asset's metadata. |
| **Include Owners** | Off | When an ingested asset's owner in the source system is an email that matches an existing Collate user, assign that user as the asset's owner. Never overwrites an owner an asset already has in Collate. |
| **Include Custom Properties** | Off | Ingest source-specific metadata that doesn't map to a standard Collate field (for example, a database-specific attribute) into custom properties on the asset, if custom properties have been defined for that entity type. |
| **Mark Deleted Tables** | On | If a table this agent previously ingested no longer exists in the source, soft-delete it in Collate too. Only affects tables within schemas this agent actually scans. |
| **Mark Deleted Stored Procedures** | On | Same as Mark Deleted Tables, but for stored procedures. |
| **Mark Deleted Schemas** | Off | If an entire schema this agent previously ingested no longer exists in the source, soft-delete the schema and everything in it. |
| **Mark Deleted Databases** | Off | If an entire database this agent previously ingested no longer exists in the source, soft-delete the database and everything in it. |
| **Override Metadata** | Off | On: values from the source (descriptions, tags, owners, display names) always overwrite what's currently in Collate, even if someone edited it there. Off: Collate only fills in fields that are still empty, so manual edits in Collate are preserved. |
| **Enable Debug Log** | Off | Run this ingestion at DEBUG log verbosity instead of the normal level. Turn on when troubleshooting a failing or unexpected run; leave off otherwise, since debug logs are much larger. |
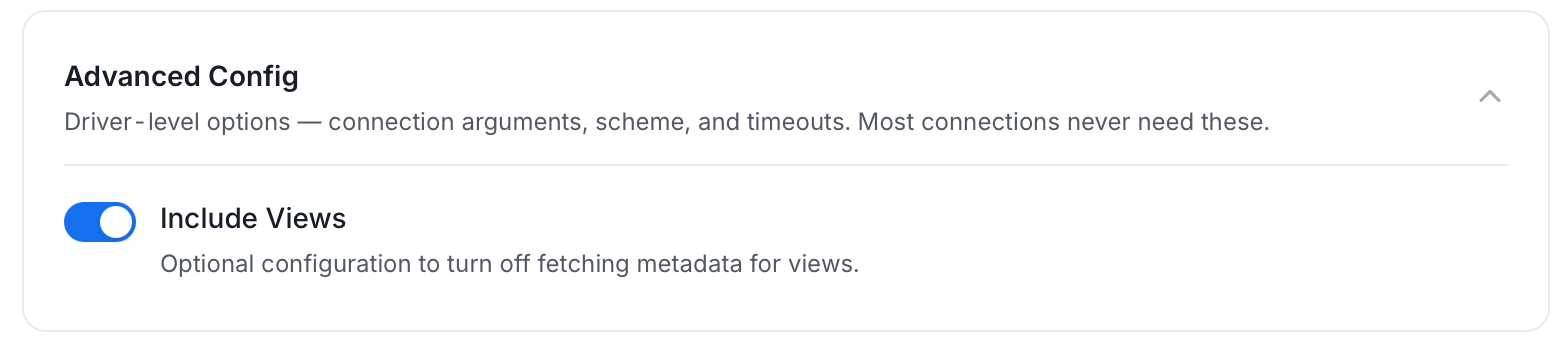
 * **Advanced Config**: Driver-level options (connection arguments, scheme, and timeouts). Most connections never need these, and they vary by connector. This section also has one ingestion-scope toggle:
| Toggle | Default | Description |
| ----------------- | ------- | --------------------------------------------------------------------------------------------------------------------------------------------------------------------------------------------------------------------------------- |
| **Include Views** | On | Ingest views in addition to tables. Turn off to skip views entirely. Since view lineage is derived from parsing each view's SQL definition, turning this off also stops view-based lineage from being generated for this service. |
* **Advanced Config**: Driver-level options (connection arguments, scheme, and timeouts). Most connections never need these, and they vary by connector. This section also has one ingestion-scope toggle:
| Toggle | Default | Description |
| ----------------- | ------- | --------------------------------------------------------------------------------------------------------------------------------------------------------------------------------------------------------------------------------- |
| **Include Views** | On | Ingest views in addition to tables. Turn off to skip views entirely. Since view lineage is derived from parsing each view's SQL definition, turning this off also stops view-based lineage from being generated for this service. |
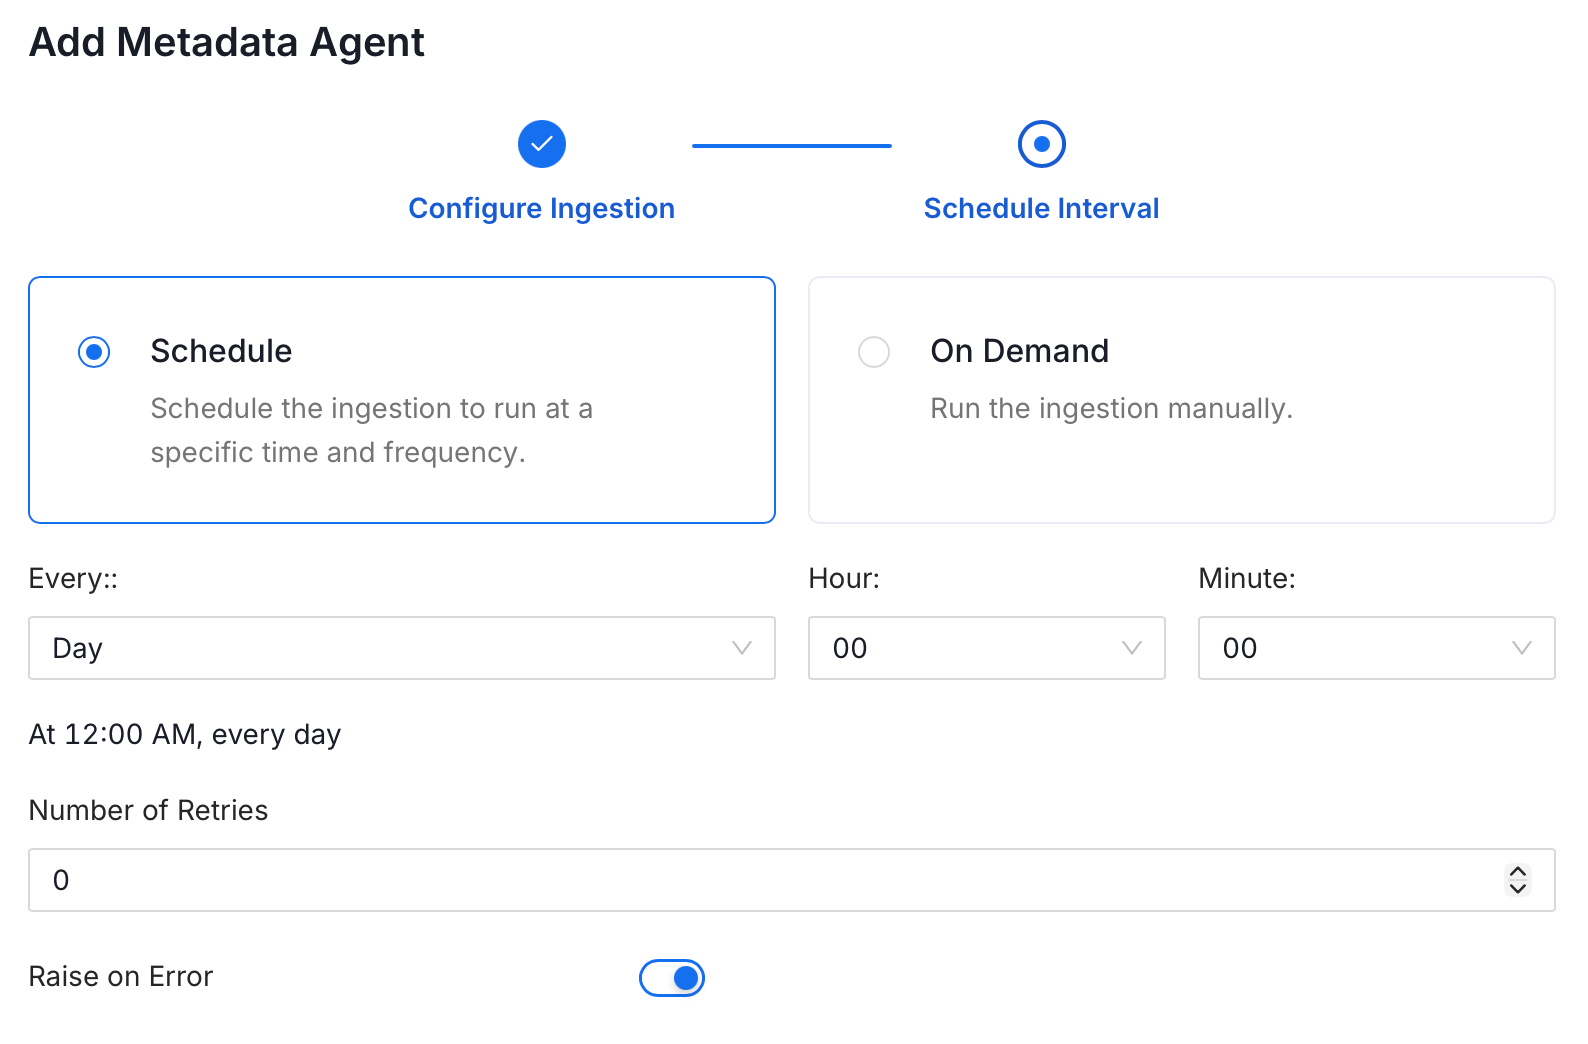
 5. On the **Schedule Interval** page, set when the agent runs:
* **Schedule**: Choose a preset interval (Hourly, Daily, Weekly, Monthly) or enter a custom cron expression.
* **On-Demand**: No automatic schedule; trigger the agent manually when needed.
5. On the **Schedule Interval** page, set when the agent runs:
* **Schedule**: Choose a preset interval (Hourly, Daily, Weekly, Monthly) or enter a custom cron expression.
* **On-Demand**: No automatic schedule; trigger the agent manually when needed.
 6. Click **Add** to deploy the agent.
## Troubleshooting
6. Click **Add** to deploy the agent.
## Troubleshooting